Hardware Requirements
Note: The following page on Technet describes
the recommended hardware requirements for a stand-alone Primary Server.
Stand-alone primary
site (SQL Server installed Locally)
·
Up to 100,000 clients
·
SQL Server is installed
on the site server computer
The following hardware
requirements are recommended for a stand-alone Primary server.
·
8 cores (Intel Xeon
E5504 or comparable CPU)
·
32 GB of RAM
·
550 GB hard disk space
for the operating system, SQL Server, and all database files
Step 1. Create the Lab Environment
We are going to create a Standalone Primary Site in our LAB (creating a CAS and then another Primary is a bit more work, I may write up that process in the future), so let's get started, and to start off with I re-used/recycled my lab from Beta 2 by applying the day 1 snapshots effectively giving me a blank activated AD and blank SCCM 2012 server with the Operating System ready and activated.
This is a huge advantage of doing labs in a virtual environment.
The SCCM 2012 RC server for this lab has a C: partition (OS) and 150GB D: partition (DATA).
The Domain Controller (AD1) is running Server 2008 R2, and is hosting the DHCP server and DNS roles.
I chose to install Windows Server 2008 R2 standard as the server OS for SCCM 2012 RC. Once done I joined it to my domain (SERVER2008R2), verified DNS was working correctly via nslookup and was ready to begin the steps below.
Create AD users:
Note: Perform the following on the Active Directory Domain Controller server as Local Administrator
In addition I created some accounts in AD, namely:
* SMSadmin, a domain user
* Testuser, a domain user
* Testuser2, a domain user
* Testuser3, a domain user
* DomJoin, a domain user,(for joining computers to the domain)
* ReportsUser, a domain user for reporting services.
* ClientInstall, a domain user used when installing the Configuration Manager Client for Client Push. This user must be a local administrator on computers you want to install the Configuration Manager Client.
* SCCMNAA, a domain user, (Network Access Account) used during OSD
Create Local Administrator accounts:
Note: Perform the following on the SCCM 2012 server as Local Administrator
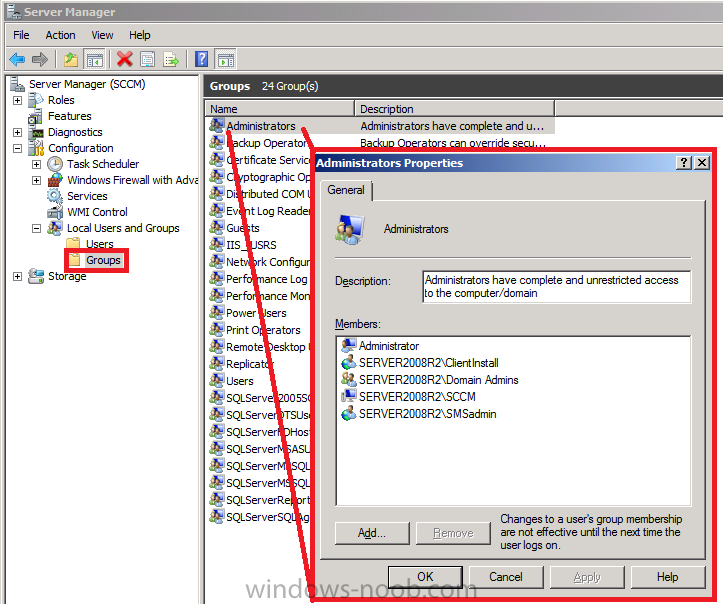
On the SCCM server add the SMSadmin user to the Local Administrators group (you can add the ClientInstall account also).


 Habib JbirSccm Administrator
Habib_jbir@hotmail.fr
+216 97 278 222
Best Regard

We are going to create a Standalone Primary Site in our LAB (creating a CAS and then another Primary is a bit more work, I may write up that process in the future), so let's get started, and to start off with I re-used/recycled my lab from Beta 2 by applying the day 1 snapshots effectively giving me a blank activated AD and blank SCCM 2012 server with the Operating System ready and activated.
This is a huge advantage of doing labs in a virtual environment.
The SCCM 2012 RC server for this lab has a C: partition (OS) and 150GB D: partition (DATA).
The Domain Controller (AD1) is running Server 2008 R2, and is hosting the DHCP server and DNS roles.
I chose to install Windows Server 2008 R2 standard as the server OS for SCCM 2012 RC. Once done I joined it to my domain (SERVER2008R2), verified DNS was working correctly via nslookup and was ready to begin the steps below.
Create AD users:
Note: Perform the following on the Active Directory Domain Controller server as Local Administrator
In addition I created some accounts in AD, namely:
* SMSadmin, a domain user
* Testuser, a domain user
* Testuser2, a domain user
* Testuser3, a domain user
* DomJoin, a domain user,(for joining computers to the domain)
* ReportsUser, a domain user for reporting services.
* ClientInstall, a domain user used when installing the Configuration Manager Client for Client Push. This user must be a local administrator on computers you want to install the Configuration Manager Client.
* SCCMNAA, a domain user, (Network Access Account) used during OSD
Create Local Administrator accounts:
Note: Perform the following on the SCCM 2012 server as Local Administrator
On the SCCM server add the SMSadmin user to the Local Administrators group (you can add the ClientInstall account also).
Step 2. Download SCCM 2012 Release Candidate
you can download it from Microsoft here.
System requirements
Supported Operating Systems: Windows Server 2003 R2 x64 editions, Windows Server 2008, Windows Server 2008 R2
Site System Requirements
you can download it from Microsoft here.
System requirements
Supported Operating Systems: Windows Server 2003 R2 x64 editions, Windows Server 2008, Windows Server 2008 R2
Site System Requirements
- Site servers and site roles require 64-bit OS (distribution points are an exception)
Branch Distribution Points
- Branch distribution points have been deprecated and replaced with standard distribution points that can be hosted on Configuration Manager 2012 client operating system platforms, with the exception of Windows XP Professional Service Pack 3 and Windows XP Tablet PC SP3
- Standard DPs can run on Windows Server 32-bit but will not support advanced functionality
Server Operating System Requirements
- Windows Server 2008 (64-bit) and Windows Server 2008 R2
- Distribution points can run on Windows Server 2003
Client Operating System Requirements
- Windows XP professional SP3 – x86 and Windows XP SP2 pro for 64 bit systems
- Windows Vista SP2 (x86,x64)
- Windows Server 2003 R2 SP2 (x86,x64)
- Windows Server 2008 (x86,x64)
- Windows Server 2008 R2 (x86,x64)
- Windows 7 (x86,x64)
Database Requirements
- SQL Server 2008 SP2 with CU 7
- SQL Server 2008 R2 with SP1 and Cumulative Update 4
- SQL Server Express 2008 r2 WITH SP1 and CU 3 is supported only on secondary sites
- SQL Reporting Services is ONLY reporting solution
For Supported Configurations information, visit http://technet.microsoft.com/en-us/library/gg682077.aspx.
Step 3. Create The System ManageMent Container
Note: Perform the following on the Active Directory Domain Controller as a Domain Administrator
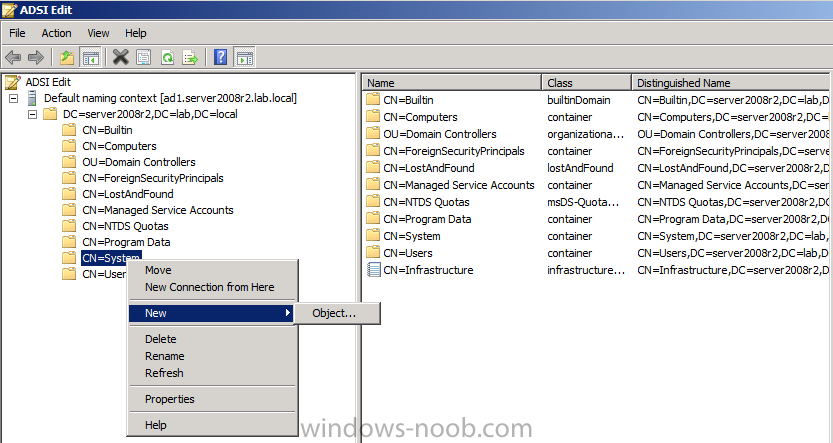
Open ADSI Edit, click on Action, Connect To and click Ok, Double Click on Default Naming Context and the DC= that appears below it. Click on the + and scroll down to CN=System.
Right Click on CN=System and choose New, Object
Step 3. Create The System ManageMent Container
Note: Perform the following on the Active Directory Domain Controller as a Domain Administrator
Open ADSI Edit, click on Action, Connect To and click Ok, Double Click on Default Naming Context and the DC= that appears below it. Click on the + and scroll down to CN=System.
Right Click on CN=System and choose New, Object
Choose Container from the options, click Next and enter System Management as the value. Click Next and Finish. Press F5 to refresh ADSI Edit and you should now see the new System Management Container. Close ADSI Edit.
Step 4. Delegate Permission to the System Management Container.
Note: Perform the following on the Active Directory Domain Controller as a Domain Administrator
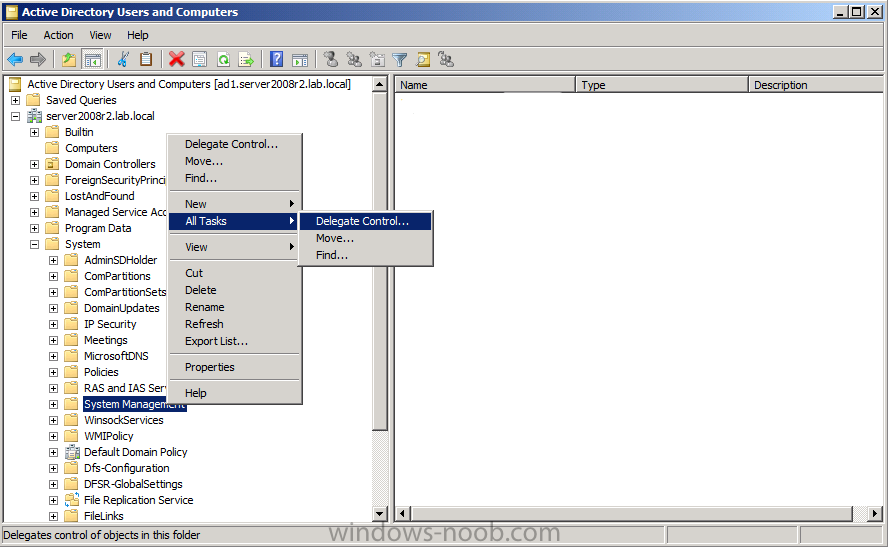
Open Active Directory Users and Computers. Click on view, select Advanced Features.
Select the System Management Container, and right click it, choose All Tasks and Delegate Control.
Step 4. Delegate Permission to the System Management Container.
Note: Perform the following on the Active Directory Domain Controller as a Domain Administrator
Open Active Directory Users and Computers. Click on view, select Advanced Features.
Select the System Management Container, and right click it, choose All Tasks and Delegate Control.
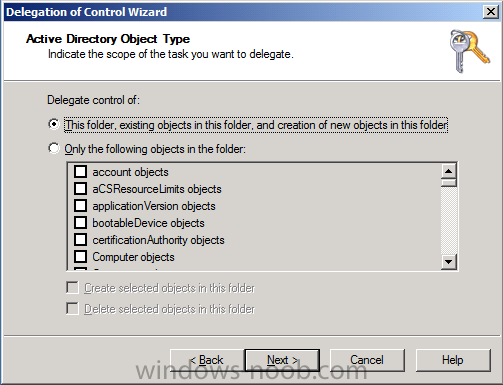
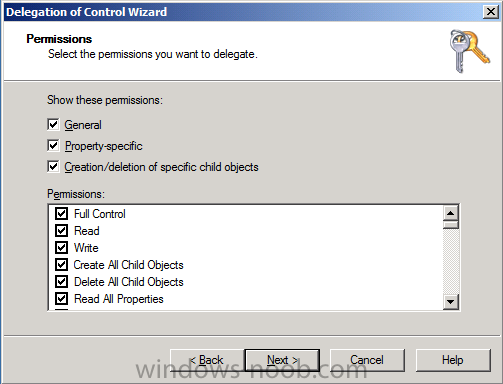
When the Welcome to Delegation of Control Wizard appears click next, then click Add. click on Object Types, select Computers. Type in yourSCCM server name and click on Check Names, it should resolve.
Click Ok, then Next. Choose Create a Custom Task to Delegate, click next, make sure This folder, existing objects in this folder and creation of new objects in this folder is selected.
click next, select the 3 permissions General, Property-Specific and Creation-deletion of specific child objects are selected then place a check mark in FULL CONTROL, and click next then Finish.
Failure to do the above will mean that the System Management Container in AD will NOT POPULATE with ConfigMgr site info needed by the Clients and you will see many errors in your site status warning you of same.
Note: Repeat the above for Each site server that you install in a Hierarchy.
Step 5. Extend the Active Directory schema for Configuration Manager
Note: Perform the following on the Active Directory Domain Controller as a Domain Administrator
Note:-
The Active Directory schema extensions for Configuration Manager 2012 are unchanged from those used by Configuration Manager 2007. If you extended the schema for Configuration Manager 2007, you do not need to extend the schema again for Configuration Manager 2012.
Perform the below on your Active Directory server, simply browse the network to your sccm server \\sccm\d$ and locate the folder where you uncompressed SCCM 2012 and find \SMSSetup\Bin\x64\Extadsch.exe, right click and choose Run As Administrator.
Step 6. Open TCP port 1433 and 4022 for SQL replication
Note: Perform the following on the Active Directory Domain Controller as a Domain Administrator
If you are setting up a hierarchy (CAS/Primary/etc) then on your AD server do the following, start Group Policy Management tool and create a new GPO,
Select Computer Configuration, Policies, Windows Settings, Windows Firewall with Advanced Security and select Inbound Rules, choose New and follow the wizard for opening up TCP port 1433 as per this guide on Technet. Once done, repeat the above for Port 4022.
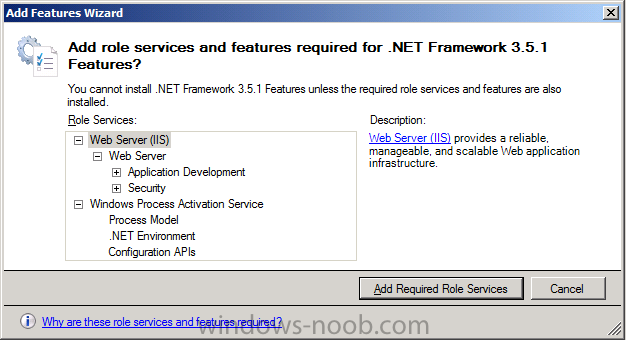
Step 7. Install .NET 3.5.1 and WCF Activation
Note: Perform the following on the SCCM 2012 server as SMSadmin
In Server Manager select Features, Add Features, Select .NET Framework 3.5.1, also select WCF Activation and when prompted answer Add Required Role Services click next and next again
Note: Repeat the above for Each site server that you install in a Hierarchy.
Step 5. Extend the Active Directory schema for Configuration Manager
Note: Perform the following on the Active Directory Domain Controller as a Domain Administrator
Note:-
The Active Directory schema extensions for Configuration Manager 2012 are unchanged from those used by Configuration Manager 2007. If you extended the schema for Configuration Manager 2007, you do not need to extend the schema again for Configuration Manager 2012.
Perform the below on your Active Directory server, simply browse the network to your sccm server \\sccm\d$ and locate the folder where you uncompressed SCCM 2012 and find \SMSSetup\Bin\x64\Extadsch.exe, right click and choose Run As Administrator.
Step 6. Open TCP port 1433 and 4022 for SQL replication
Note: Perform the following on the Active Directory Domain Controller as a Domain Administrator
If you are setting up a hierarchy (CAS/Primary/etc) then on your AD server do the following, start Group Policy Management tool and create a new GPO,
Select Computer Configuration, Policies, Windows Settings, Windows Firewall with Advanced Security and select Inbound Rules, choose New and follow the wizard for opening up TCP port 1433 as per this guide on Technet. Once done, repeat the above for Port 4022.
Step 7. Install .NET 3.5.1 and WCF Activation
Note: Perform the following on the SCCM 2012 server as SMSadmin
In Server Manager select Features, Add Features, Select .NET Framework 3.5.1, also select WCF Activation and when prompted answer Add Required Role Services click next and next again
Step 8. Download and install .NET 4
Note: Perform the following on the SCCM 2012 server as SMSadmin
Download .NET 4 from here (webinstall) or here (Standalone). Double click the file, After a while it will complete, Click Finish when done
Note: Perform the following on the SCCM 2012 server as SMSadmin
Download .NET 4 from here (webinstall) or here (Standalone). Double click the file, After a while it will complete, Click Finish when done
restart when prompted
Note: In some scenarios, such as when IIS is installed or reconfigured after the .NET Framework version 4.0 is installed, you must explicitly enable ASP.NET version 4.0. For example, on a 64-bit computer that runs the .NET Framework version 4.0.30319, run the following command:%windir%\Microsoft.NET\Framework64\v4.0.30319\aspnet_regiis.exe –i –enable
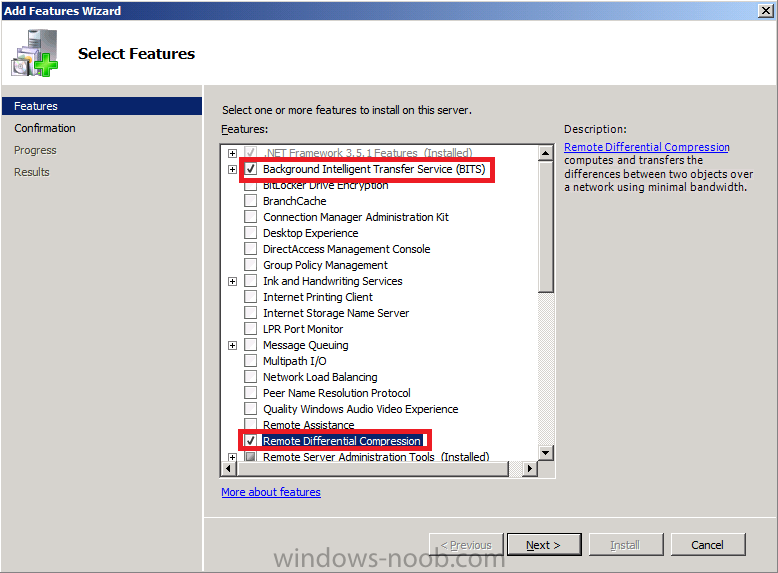
Step 9. Add BITS and Remote Differential Compression
Note: Perform the following on the SCCM 2012 server as SMSadmin
Finally, in Server Manager click on Add Features, place a selection mark in BITS and RDC.
Note: In some scenarios, such as when IIS is installed or reconfigured after the .NET Framework version 4.0 is installed, you must explicitly enable ASP.NET version 4.0. For example, on a 64-bit computer that runs the .NET Framework version 4.0.30319, run the following command:%windir%\Microsoft.NET\Framework64\v4.0.30319\aspnet_regiis.exe –i –enable
Step 9. Add BITS and Remote Differential Compression
Note: Perform the following on the SCCM 2012 server as SMSadmin
Finally, in Server Manager click on Add Features, place a selection mark in BITS and RDC.
Step 10. Download Microsoft SQL Server 2008 SP2 CU7
(if you plan on using SQL Server 2008 R2 see 10.b below)
Note: Perform the following on the SCCM 2012 server as SMSadmin
The supported versions of SQL Server 2008 and SQL Server 2008 R2 are listed here on Technet:- http://technet.micro...nfigSQLDBconfig
At the time of writing this guide I chose to use SQL Server 2008 SP2, CU6 with the hotfix mentioned below, that is fine for Release Candidate 1.
If you are using RC2, then use CU7 instead of CU6 and the hotfix, or use SQL Server 2008 R2 SP1 CU4 as described in 10.b below). Be aware that If you use SQL Server Standard, your CAS will only be able to support 50k clients.
Download SQL Server 2008 Standard (x86, x64) - DVD (English) from your provider (MSDN or Technet) the one I used was
File Name: en_sql_server_2008_standard_x86_x64_dvd_x14-89155.iso
Note: You can download the Trial version (180 days) from here.
While you are at it download SQL Server 2008 SP2 from here - File Name: SQLServer2008SP2-KB2285068-x64-ENU.exe
Next download CU7 , you can download CU7 from here.
Next Download the CU6 from here
Finally, you also need to Download 2603910
Step 10.b
This step if you decide to use SQL Server 2008 R2. If you want to use this version then the supported version is SQL Server 2008 R2 SP1 CU4.
Download the following from Technet:- File Name: en_sql_server_2008_r2_standard_x86_x64_ia64_dvd_521546.iso (4177 MB)
Download Microsoft® SQL Server® 2008 R2 Service Pack 1
Download Cumulative update package 4 for SQL Server 2008 R2 Service Pack 1
Step 11. Install SQL Server 2008
Note: Perform the following on the SCCM 2012 server as SMSadmin
For SQL Collation note that you must use (It is required whether you have a hierarchy of sites or a single site and regardless of the OS languages.):-SQL_Latin1_General_CP1_CI_AS
To Install SQL server you can follow this guide but please install SQL on D:\Program Files... and when running setup.exe right click and choose Run as Administrator.
After you install SQL Server 2008, you must install SP2 and then CU6 and finally install KB2603910.
So install it in this order:
SQL Server 2008 >> SQL Server 2008 SP2 >> SQL Server 2008 Cumulative Update 6 >> KB2603910
Note: CU7 is available and it's supposed to contain the above hotfix, however i have not tested it yet.
Step 12. Install Configuration Manager 2012 Release Candidate.
Note: Perform the following on the SCCM 2012 server as SMSadmin
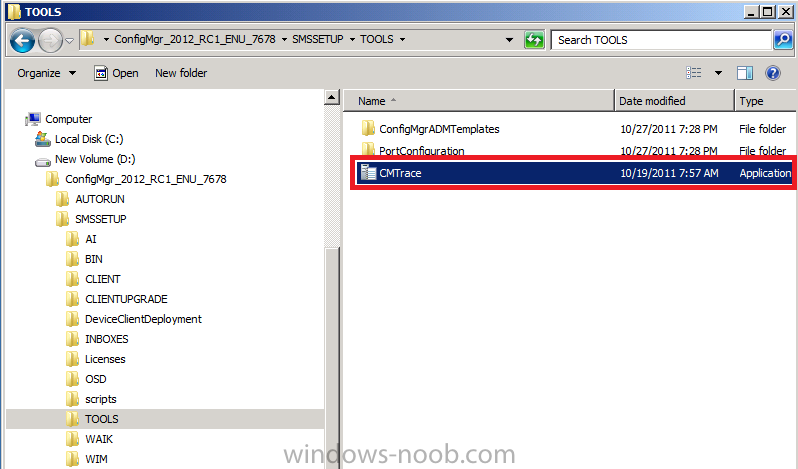
TIP: you can open C:\ConfigMgrSetup.log with Configuration Manager Trace Tool available in the extracted media to and review the contents of the file, it will inform you of any issues during installation.
(if you plan on using SQL Server 2008 R2 see 10.b below)
Note: Perform the following on the SCCM 2012 server as SMSadmin
The supported versions of SQL Server 2008 and SQL Server 2008 R2 are listed here on Technet:- http://technet.micro...nfigSQLDBconfig
At the time of writing this guide I chose to use SQL Server 2008 SP2, CU6 with the hotfix mentioned below, that is fine for Release Candidate 1.
If you are using RC2, then use CU7 instead of CU6 and the hotfix, or use SQL Server 2008 R2 SP1 CU4 as described in 10.b below). Be aware that If you use SQL Server Standard, your CAS will only be able to support 50k clients.
Download SQL Server 2008 Standard (x86, x64) - DVD (English) from your provider (MSDN or Technet) the one I used was
File Name: en_sql_server_2008_standard_x86_x64_dvd_x14-89155.iso
Note: You can download the Trial version (180 days) from here.
While you are at it download SQL Server 2008 SP2 from here - File Name: SQLServer2008SP2-KB2285068-x64-ENU.exe
Next download CU7 , you can download CU7 from here.
Step 10.b
This step if you decide to use SQL Server 2008 R2. If you want to use this version then the supported version is SQL Server 2008 R2 SP1 CU4.
Download the following from Technet:- File Name: en_sql_server_2008_r2_standard_x86_x64_ia64_dvd_521546.iso (4177 MB)
Download Microsoft® SQL Server® 2008 R2 Service Pack 1
Download Cumulative update package 4 for SQL Server 2008 R2 Service Pack 1
Step 11. Install SQL Server 2008
Note: Perform the following on the SCCM 2012 server as SMSadmin
For SQL Collation note that you must use (It is required whether you have a hierarchy of sites or a single site and regardless of the OS languages.):-SQL_Latin1_General_CP1_CI_AS
To Install SQL server you can follow this guide but please install SQL on D:\Program Files... and when running setup.exe right click and choose Run as Administrator.
After you install SQL Server 2008, you must install SP2 and then CU6 and finally install KB2603910.
So install it in this order:
SQL Server 2008 >> SQL Server 2008 SP2 >> SQL Server 2008 Cumulative Update 6 >> KB2603910
Note: CU7 is available and it's supposed to contain the above hotfix, however i have not tested it yet.
Step 12. Install Configuration Manager 2012 Release Candidate.
Note: Perform the following on the SCCM 2012 server as SMSadmin
TIP: you can open C:\ConfigMgrSetup.log with Configuration Manager Trace Tool available in the extracted media to and review the contents of the file, it will inform you of any issues during installation.
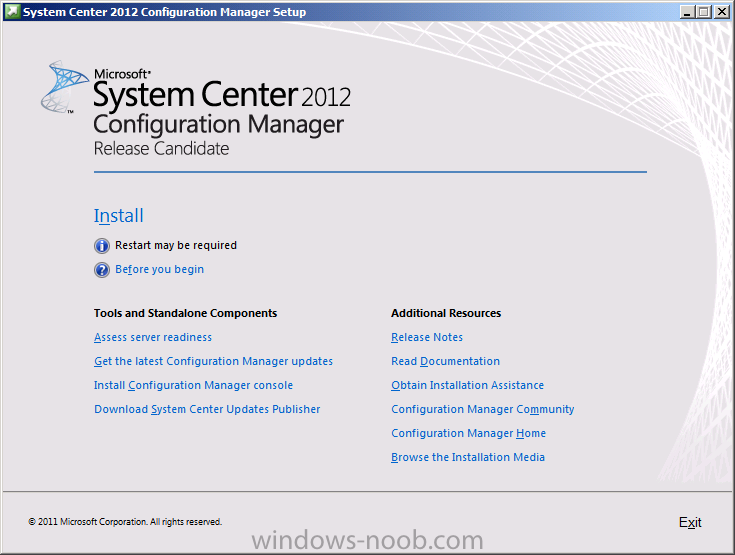
Uncompress the EXE by running it, then browse to where you uncompressed it and click on Splash.hta
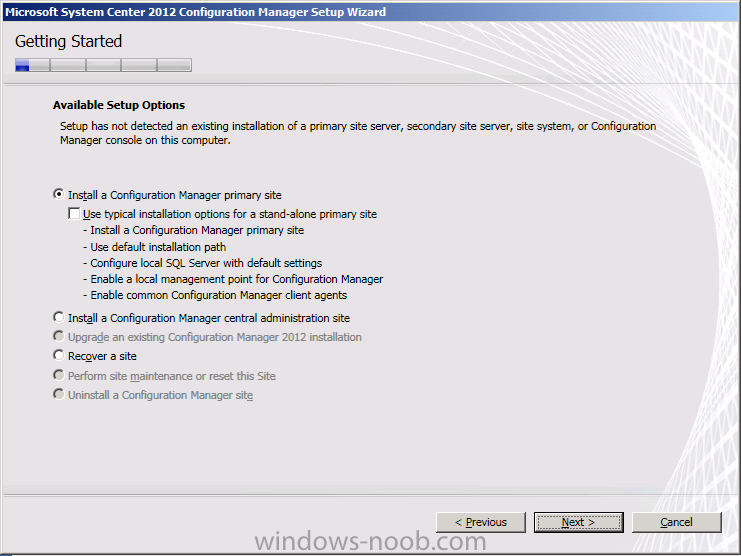
when the wizard appears, click on Install, click next at the warning and then select Install a Configuration Manager Primary Site
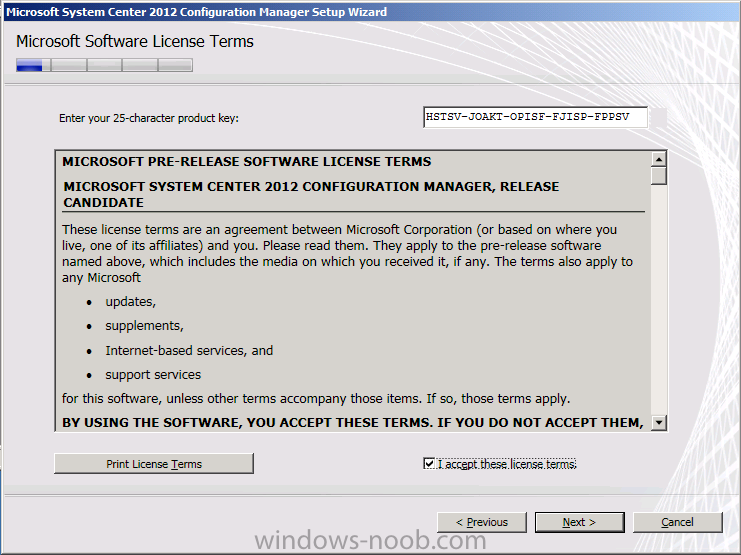
at the EULA click accept
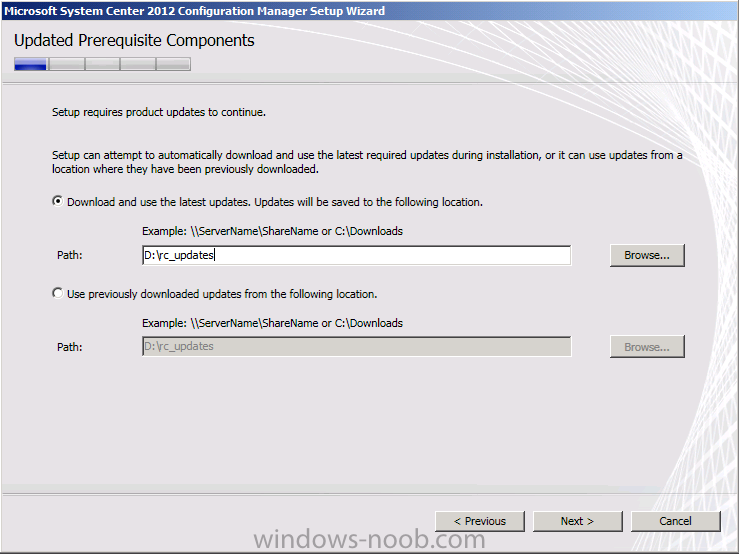
Create a folder on D:\ called RC_Updates and then specify the path to download the updates
Tip:
If you don't have internet on your SCCM server then you can download the required updates on another computer by doing like so:-
Tip:
If you don't have internet on your SCCM server then you can download the required updates on another computer by doing like so:-
- Open a command prompt with administrative permissions
- Navigate to .\Configuration Manager 2012 Install source\smssetup\bin\X64
- Run SetupDL.exe target dir (in my example SetupDL.exe D:\RC_Updates)
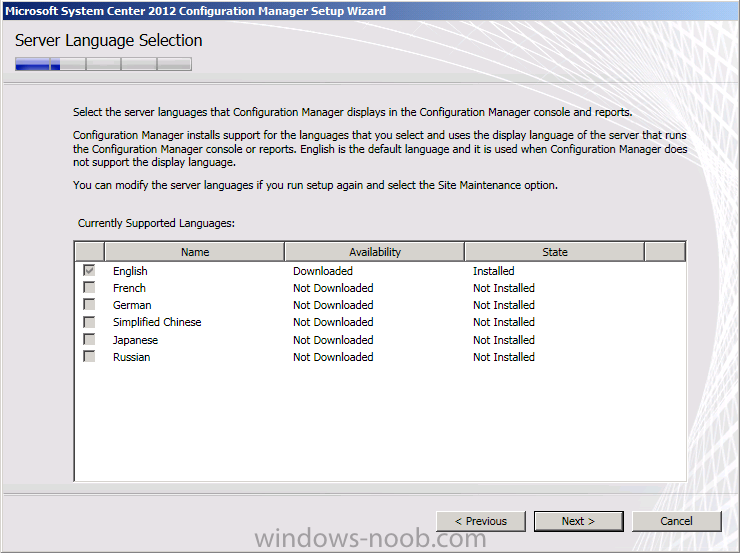
Click next at the Server Language screen
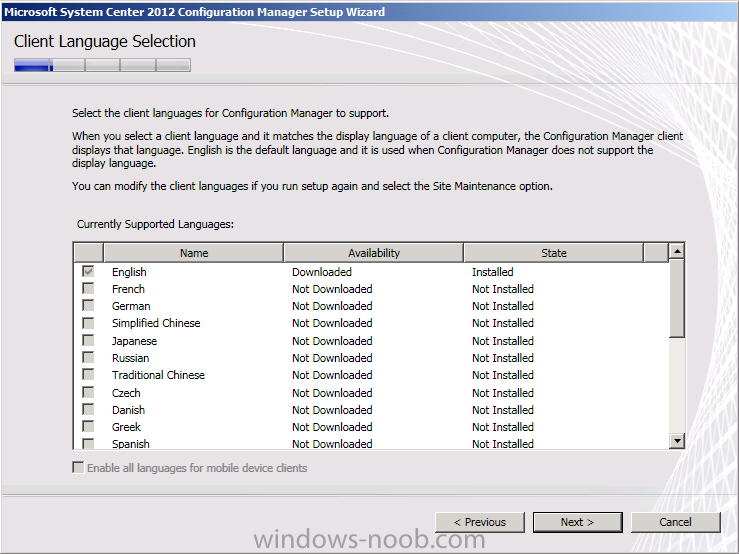
and at the Client Language Screen
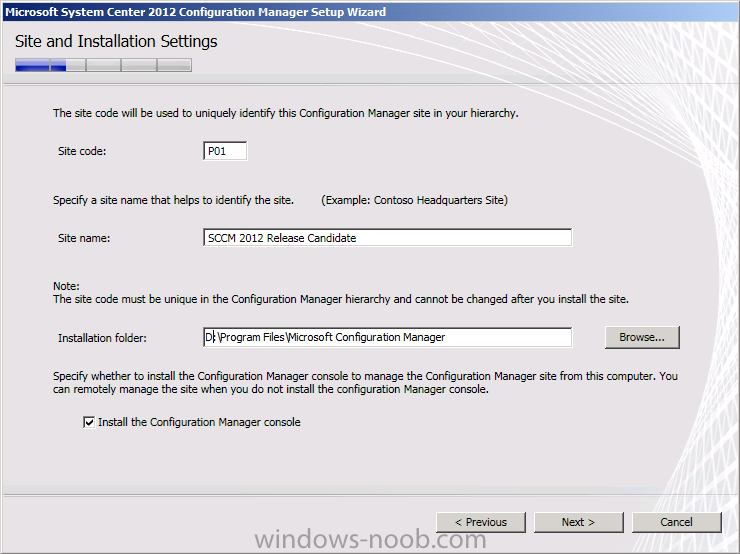
enter your Site and Installation Settings, install the site on D:\ as per below screenshot
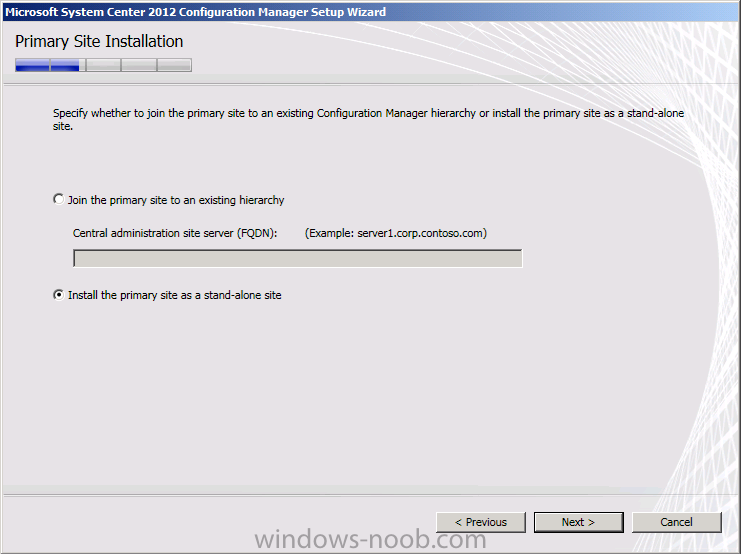
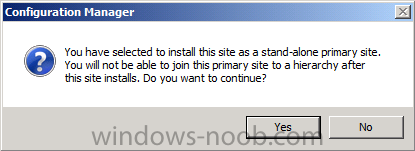
select Standalone as the site type
take note of the warning (ie: if will not be able to join it to an existing site heirarchy later)
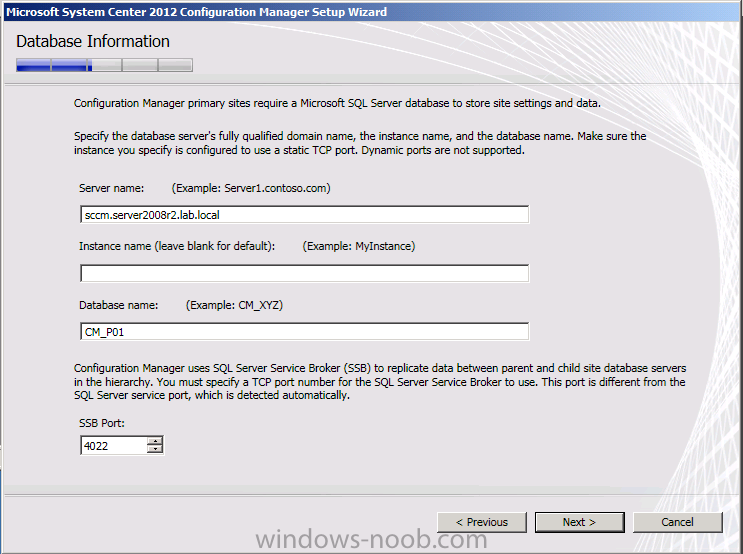
review the Database Information
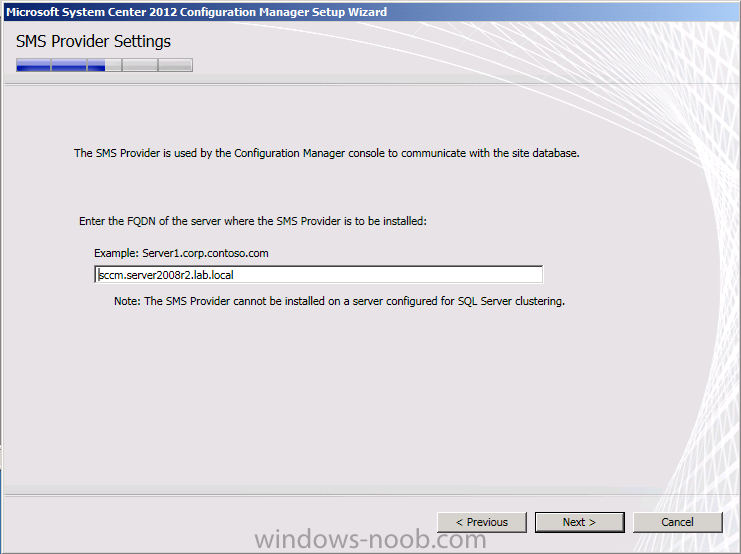
review the SMS provider settings
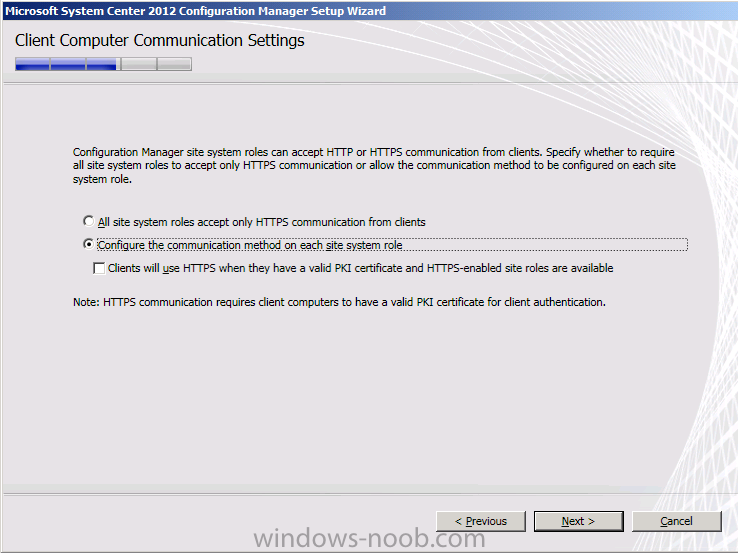
review the Client computer communication settings, select Configure the Communication method on each site system role
review the site system roles
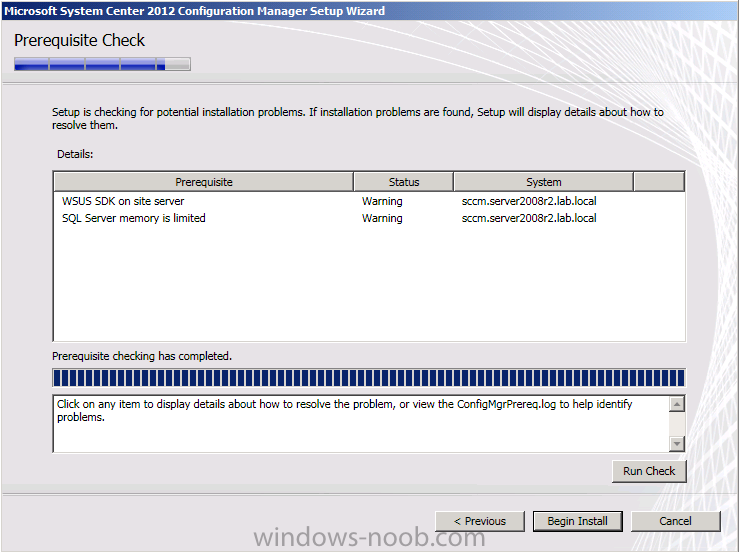
click next at the CEIP screen then review the summary
take note of any warnings, if like mine (WSUS and SQL memory, we can fix them later, no problem)
click on Begin Install
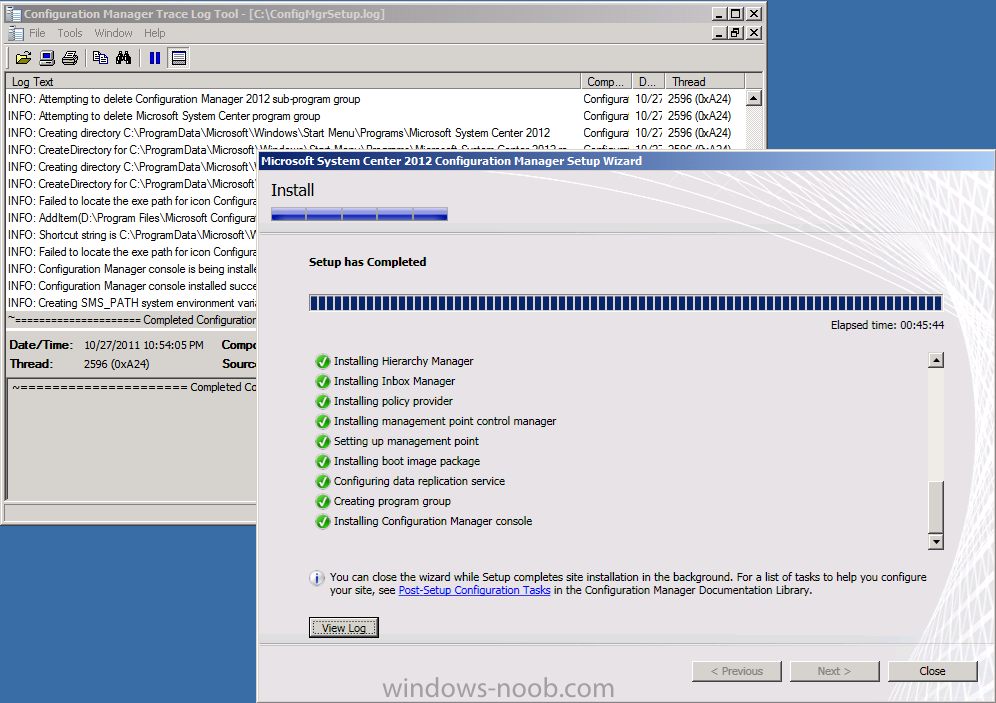
now is a good time to look at the C:\ConfigMgrSetup.log with CMtrace, watch it for errors
now is a good time to look at the C:\ConfigMgrSetup.log with CMtrace, watch it for errors
after a long install you should see the installer finish, click on Close
reboot the SCCM server and then login again as SMSadmin
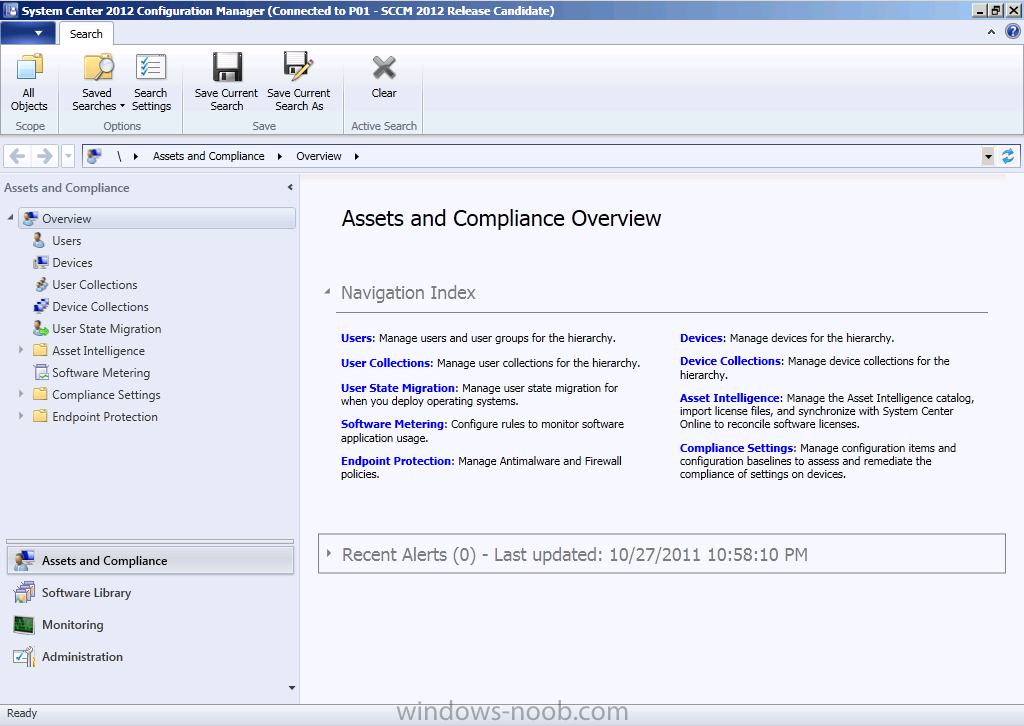
start the Configmgr console
congratulations, you've installed System Center 2012 Configuration Manager Release Candidate
start the Configmgr console
congratulations, you've installed System Center 2012 Configuration Manager Release Candidate
Habib JbirSccm AdministratorHabib_jbir@hotmail.fr
+216 97 278 222
Best Regard